Start with a receiver, a way to decode APRS packets, and a clear distinction between radio traffic and an internet map. Once you can receive local packets, configure your own licensed call sign, a correct position and a locally appropriate path, then send one position report. A successful first session is a verified packet and a short exchange with another operator, rather than an unattended stream of dots.
APRS stands for Automatic Packet Reporting System. It carries small pieces of timely information: station positions, messages, weather, objects and local operating information. This guide uses traditional 1200-baud VHF FM APRS in the United States, not a digital-voice radio's proprietary position-reporting feature or a different LoRa network. These systems can share vocabulary without sharing an RF channel or modem.
Learn Where a Packet Actually Travels
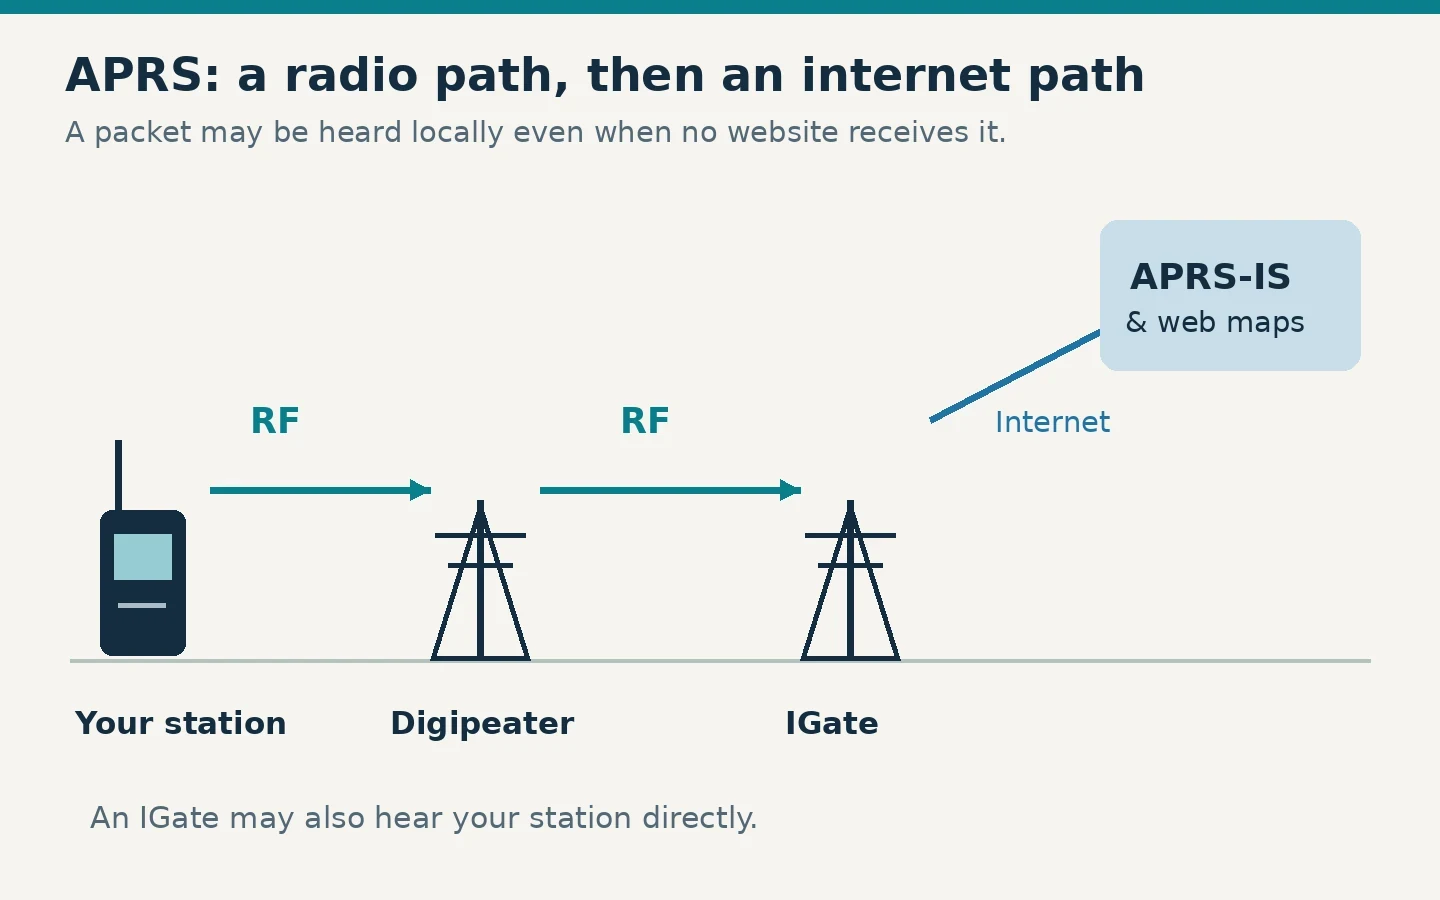
Your radio sends a short burst of data. A nearby APRS radio may decode it directly. A digipeater receives packets and retransmits selected ones to extend their radio reach. An IGate, short for internet gateway, can hear radio packets and forward them to APRS-IS, the APRS Internet System. A website or app can then display them. An IGate can also hear you directly; every packet does not need a digipeater.
Those are different success conditions. A friend decoding your beacon across town demonstrates an RF path. Your call sign appearing on aprs.fi demonstrates that the data reached its internet service; it does not, by itself, prove your radio transmitted, because internet-connected apps can originate reports too. Conversely, a beacon missing from a map may have worked over the air without reaching an IGate.
For a first experiment, arrange for a local APRS operator to monitor your call sign and report what they receive. That gives you a useful observation even if the internet side is unavailable. Ask which frequency, path and beacon rate are appropriate locally before importing somebody else's settings.
Choose One Modest Station Arrangement
An integrated APRS transceiver combines the radio with some or all of the packet modem, position source and user interface. Before choosing one, check the manual for both transmit and receive APRS, message handling and position input. A radio that advertises GPS or APRS transmission alone may not provide the two-way workflow you want.
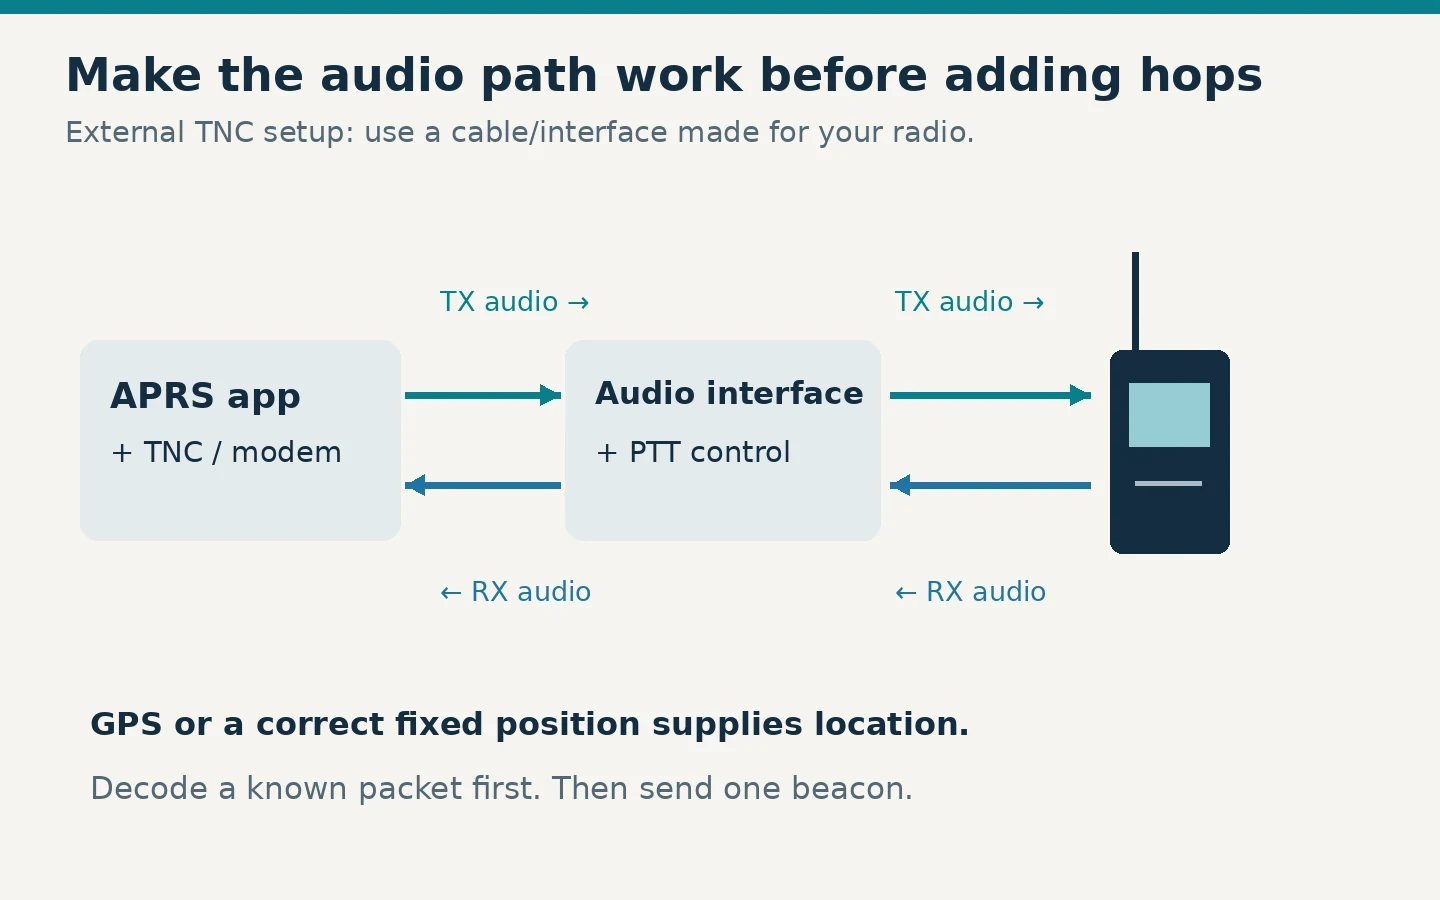
The alternative is a suitable FM radio plus a TNC, or terminal node controller. The TNC turns packet data into radio audio and decodes received audio back into data. It can be a separate hardware modem or software running on a computer with an appropriate audio/PTT interface. PTT means push-to-talk: the control that tells the transmitter to key. The APRS app provides the station display, messages and position data.
For an external arrangement, check the radio and interface manuals together. Confirm the correct connectors, audio levels and PTT method. Use a purpose-made compatible cable rather than guessing which microphone contact carries audio. Start with transmit disabled in the software while you establish reception. A wrong PTT setting can hold the transmitter on continuously.
A GPS receiver is convenient for movement, but a correctly entered fixed location can serve a stationary test. Enter it in the format the app expects. Decimal degrees and degrees/minutes are different formats, and the longitude sign or E/W setting matters. Check the plotted location against a place you recognize before enabling any automatic beaconing.
If you are still choosing equipment, borrow an integrated unit or try receive-only decoding with club help first. The first purchase should solve an identified missing function, such as a supported interface, rather than duplicate a modem that is already built into your radio.
Configure Identity and the Local RF Channel
For US transmission, you need amateur authorization covering the band and emission. Technician and higher classes have relevant 2-meter privileges under FCC §97.301; the other Part 97 conditions still apply. Reception does not authorize transmission. These rule references and the operating sources were checked October 29, 2026.
Set the following deliberately rather than accepting every imported default:
| Setting | A useful first check |
|---|---|
| Call sign and SSID | Your actual call sign; a suffix appropriate to this station |
| RF frequency | 144.390 MHz is the traditional channel in much of the US; verify local usage |
| Modem | Traditional 1200-baud AFSK (audio-frequency-shift keying) APRS for this setup |
| Radio channel | Simplex: transmit and receive on the same frequency, without an ordinary voice-repeater offset |
| Position | A current GPS fix or a verified fixed location |
| Digipeater path | The shortest locally recommended path |
| Beaconing | Start manually; add a modest automatic rate after verification |
An SSID is the small suffix after the call sign, such as -9 conventionally associated with a mobile station. It distinguishes stations using the same base call sign; it is not another license and should not be somebody else's identity. Use a consistent suffix so your test partner knows which station to watch.
A path such as WIDE1-1,WIDE2-1 requests two relay opportunities under the commonly used New-N system. It is a useful example to discuss with the local operator, not a setting to maximize. A nearby direct IGate may make a longer path unnecessary. More hops create more transmissions and can make a busy shared channel less useful. Leave TCPIP and internet q constructs out of an RF path; those belong to the internet/gateway side.
Use the manufacturer's APRS-specific receive and transmit instructions for squelch, audio and channel settings. Do not add voice tone squelch merely because a nearby voice repeater uses a tone. With an external audio decoder, a closed audio path can prevent packets reaching the modem even while the radio's meter shows a strong signal.
Verify Reception Before Sending a Beacon
Tune the confirmed APRS channel and watch for received station records. Packet bursts can be very short; hearing a burst is not the same as decoding it. Confirm that at least one packet becomes readable data with a plausible source call sign. With an external modem, choose the correct audio device and radio input, then adjust receive level according to the decoder's guidance.
If nothing decodes, have a local operator send a known test packet within reliable coverage. Check the antenna connection, correct frequency, radio audio output and modem input. If the decoder sees no audio at all, fix that connection before changing paths. If it sees audio but produces no valid packets, check levels and modem settings. Distorted, clipped audio is not improved simply by turning every level up.
Do not run a phone app in internet mode and mistake its online station list for decoded RF. For this check, use the radio/TNC receive log or a display explicitly showing packets received over the air. Keep one known received packet as your baseline before enabling transmit.
Send One Position and Follow Its Evidence
With the antenna connected and the channel clear, enable transmission and send one manual position report. Watch whether PTT releases afterward. Have your partner read back the exact call sign/SSID, position and comment they decoded. Use a short, non-sensitive comment; omit your home address, travel plan and any claim of emergency monitoring.
If the position is wrong, disable beaconing while you correct the coordinate format, hemisphere or stale GPS fix. If PTT stays on or transmissions repeat unexpectedly, stop the software or switch the transmitter off and fix the configuration before trying again. A functioning packet station needs an appropriate transmission rate as well as valid data.
Now check the internet map if one is available. Search for your exact call sign and SSID, expand the time window, and inspect the latest report's timestamp and raw path information. A new RF-gated record helps distinguish this transmission from an older internet-originated position. A breadcrumb trail from yesterday is not confirmation of today's test.
After the manual test, choose a modest automatic beacon interval with local guidance. As an initial stationary experiment, minutes between reports make more sense than repeated bursts every few seconds. Movement-aware beaconing can be useful later, but check its minimum interval and turn-trigger settings before using it in a crowded area. A parked radio does not need to advertise an unchanged position continuously.
Try a Short Addressed Message
Arrange a test with an operator whose APRS station is receiving messages. Address the message to their exact call sign and SSID, write a short plain-language greeting and send it once. Check for a reply and, where the software supports it, an acknowledgment. The acknowledgment is useful delivery feedback, but a human reply is the better check that your intended recipient can actually read and answer.
Internet-to-radio delivery is selective. APRS-IS gateway criteria depend on matters such as whether the destination was heard locally recently and whether a transmit-capable IGate can reach it. A dot on a web map does not guarantee a working return message path.
If the software retries messages automatically, inspect the retry status rather than pressing Send repeatedly. Stop a failed test after a reasonable attempt and compare logs with your partner. Do not send passwords, private medical details or encoded messages intended to conceal their meaning. US amateur rules restrict obscured-meaning traffic, and APRS reports can be heard and redistributed.
Troubleshoot by the Last Verified Step
| Last good observation | Likely next area to investigate |
|---|---|
| No received RF packets | Frequency, coverage, antenna, radio-to-decoder audio |
| Reception works; your beacon is not heard locally | PTT, transmit audio, power, correct channel and path |
| Partner hears you; map does not show a fresh report | IGate coverage, malformed position, map filters and timestamp |
| Map updates; addressed message fails | Destination SSID, receiving capability and return RF gateway path |
| Position appears far away | Coordinate format, hemisphere selection, fixed-position entry or GPS validity |
Keep the working settings, one decoded receive record, your first successful beacon and the message result in your station notes. That small baseline makes later changes manageable. APRS becomes useful when you can tell which link worked, which link did not, and what information you can responsibly share on the local channel.