FT8 is a narrowband amateur digital mode designed for short, structured contacts under weak-signal conditions. A computer encodes call signs, signal reports and acknowledgments into tones sent through an SSB radio, then decodes replies during alternating receive periods. Ordinary FT8 uses 15-second transmit/receive intervals and occupies about 50 Hz per signal.
It is useful for learning what paths your station can support when voice is difficult, but it is not a conversational text mode or a guarantee of a contact. Begin by receiving and decoding successfully before enabling transmission.
What the Short Exchange Accomplishes
A basic FT8 contact, or QSO, exchanges the two stations' call signs, a report or other information, and acknowledgments. Messages are structured so the software can encode them efficiently. A four-character Maidenhead locator, often called a grid square, commonly appears in a CQ or initial reply.
CQ invites a contact. A reply addresses the station calling CQ and includes the replying station's identity. The stations then exchange reports, acknowledge them and finish. These messages may look terse because the mode is designed around that minimal exchange rather than a long typed conversation.
A signal report such as −12 is an estimated signal-to-noise ratio in decibels using the application's reference convention, not an S-meter reading of S-minus-twelve. The WSJT-X guide specifies a 2,500 Hz reference noise bandwidth for its reports. A negative report can accompany a valid decode because the information is recovered from a much narrower structured signal.
A received report also does not measure how much transmitter power the other operator used or how efficient their antenna is. Treat it as a report about the received signal under those conditions.
Why Timing and Narrow Bandwidth Matter
FT8 uses eight-tone frequency-shift keying with error-correcting coding and synchronization patterns. The WSJT-X protocol description gives 6.25 baud and an occupied bandwidth of 50 Hz. The receiver uses the known structure to search for and decode signals that may be hard to understand by ear.
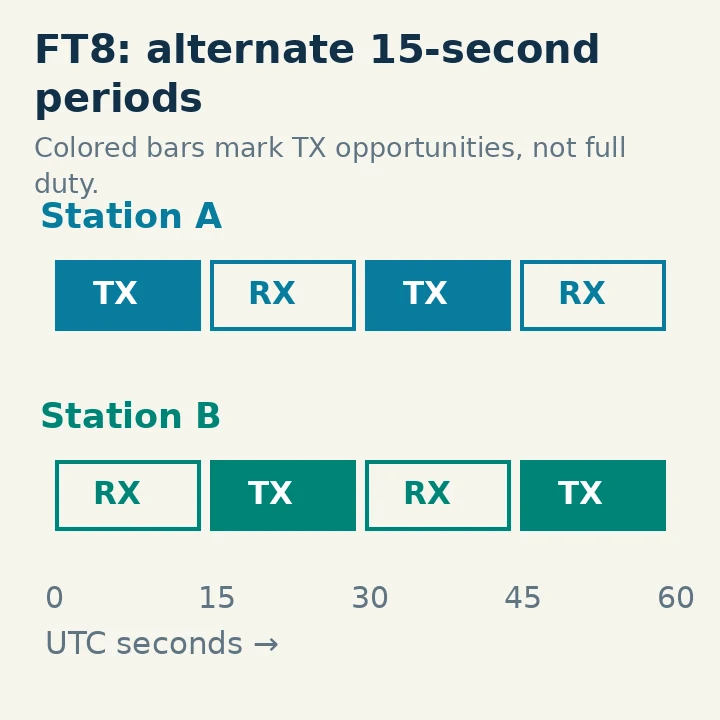
In normal operation, stations alternate 15-second intervals. One station transmits while the other receives, then they swap. Several different contacts can occupy distinct audio-frequency positions within the same SSB receive passband, but overlapping signals and interference still matter.
The computer clock must be synchronized closely enough to the UTC timing. The current guide calls for synchronization within about one second. Set the operating system's time service correctly and verify its synchronization status. Merely displaying the correct time zone does not prove the underlying UTC clock is accurate.
The timing diagram shows alternating opportunities to transmit, not continuous transmission for every millisecond of the interval. It also shows why repeatedly choosing the same period as the other station prevents the two of you from listening to each other.
Check the Band and Your Privileges
For a US example, 14.074 MHz is a commonly configured 20-meter FT8 dial frequency. It is a convention, not an assigned exclusive channel or an automatic grant of permission. The WSJT-X frequency table contains conventional working frequencies and explicitly allows them to change.
US General, Advanced and Amateur Extra control operators have appropriate 20-meter data privileges; a Technician license does not grant 20-meter FT8 transmission. Technicians can use suitable authorized bands and data segments elsewhere, including appropriate VHF/UHF amateur segments, so FT8 itself is not “General only.” Check the actual band, segment and emission before transmitting. FCC §§97.301, 97.305 and 97.307 were checked October 29, 2026.
Stay clear of band edges and other protected or restricted segments. The entire transmitted signal, including its audio offset above the dial reference, must remain within your authorized spectrum. A software band button can tune a radio; it cannot decide every operator's legal privileges or local interference conditions.
Assemble Three Working Paths
You need receive audio from the radio to the computer, transmit audio from the computer to the radio, and an appropriate PTT/control arrangement. A modern USB radio may carry several functions through one cable; older equipment may require an interface. Follow both the radio manual and the WSJT-X setup guide.
CAT, computer control of the transceiver, can read and set frequency and mode. It is distinct from audio. A successful CAT test does not prove that WSJT-X hears the radio, and a visible waterfall does not prove that the correct radio can be keyed.
In WSJT-X, enter your own call sign and grid locator. Select the matching radio/control configuration and the actual audio input/output devices. Keep Enable Tx off while establishing the receive path. If possible, arrange a transmit-inhibited or otherwise controlled test configuration until you deliberately reach the transmit checks.
Use USB or the radio's appropriate USB data mode. Disable speech compression and avoid unintended microphone mixing on the transmit-audio path. Use a sensible receive passband and a clean receive-processing baseline. Do not mistake a narrow audio filter suitable for one CW tone for a useful way to receive the entire FT8 activity area.
Prove Reception Before Changing Transmit Settings
Tune to an authorized band you can monitor and select normal FT8 mode. Start Monitor and verify that the waterfall changes with received audio. Then wait through several intervals and inspect decoded messages.
If the waterfall is active but there are no decodes, check the clock, selected mode, frequency, audio input and level. If the waterfall is blank, begin with the receive audio device and routing. Do not increase transmitter power to fix either problem.
The guide describes adjusting receive background level to around 30 dB on its input meter with no signals present. Use that as the documented software setup point, while checking that strong signals do not clip the computer input. A loud speaker volume is not necessarily the same as the USB audio level sent to the computer.
You can also use the guide's sample audio files to learn decoding and controls without transmitting or relying on current propagation. Successful sample decoding tests the software path; successful live decoding adds a check of your radio's receive-audio arrangement.
Keep Dial Frequency and Audio Offset Separate
The wide graph commonly shows audio offsets within the SSB passband. The radio dial and that offset together determine where the signal goes over the air. For example, at a 14.074000 MHz USB dial setting, a signal near a 1,500 Hz audio offset is near 14.075500 MHz RF.
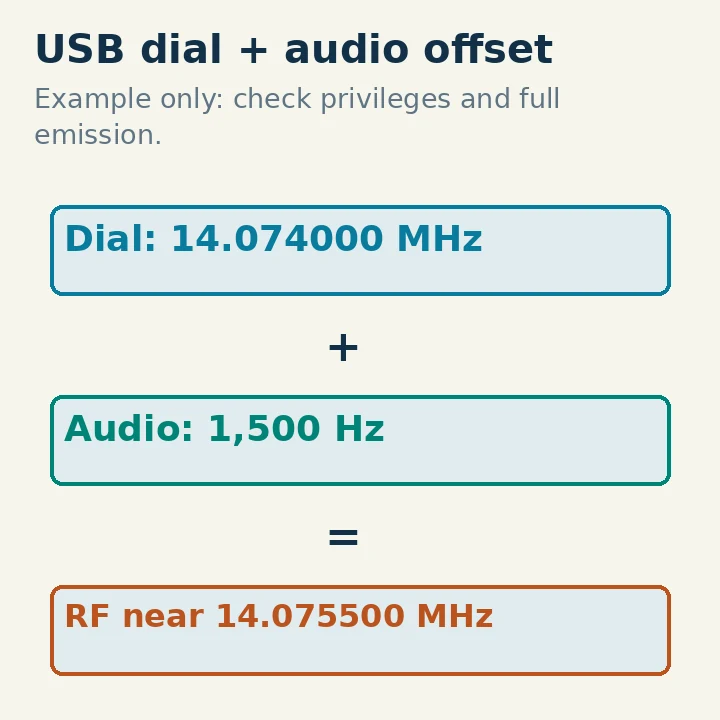
The exact occupied tones span a small range around the software's selected signal position; do not treat the offset marker as a complete emission boundary. Leave room for the whole signal and verify the application's frequency convention.
Receive and transmit offsets can be separate. Following the guide's Hold Tx Freq behavior can keep your transmit audio position from following every selected caller. Choose a clear position and confirm it lies in the intended passband. Do not drag a waterfall marker while a transmission is active simply to experiment.
Set a Clean Transmit Level Deliberately
A Tune or Test PTT button can actually key the radio. Before using it, confirm frequency, mode, antenna or properly rated dummy load, legal privileges and how to stop transmission. Keep a test brief and under your control.
Follow the radio and WSJT-X guides for audio drive. The WSJT-X Pwr control adjusts audio output, not a calibrated universal RF-watt setting. Excess drive and speech processing can create distortion and unwanted products. Raising both the computer audio and radio power controls to maximum is not a valid setup method.
FT8 produces sustained digital transmissions rather than ordinary speech peaks. Respect the radio's duty-cycle, temperature and interface limits, and use only the power needed for the communication. A compact radio may need a substantially lower continuous digital setting than its headline voice rating suggests. Stop if the station shows a fault or abnormal heating rather than continuing to chase a decode.
If CAT-based split or software frequency shifting is configured, let the documented radio setup handle that arrangement; the displayed dial may move to keep transmitted audio in a suitable range. Verify the resulting RF frequency rather than forcing every station into the arithmetic of a fixed-dial example.
Follow One Ordinary Contact to Completion
For a first attempt, use normal FT8 operation, not a special expedition or contest mode. Select a clearly decoded CQ from a station you can hear reliably. In the documented workflow, double-clicking a decoded line can populate the station and messages, but verify the generated call signs, transmit period and offset before enabling transmission. Software options can make that action initiate transmission, so learn the receive-only controls first.
A teaching sequence is: station A calls CQ; B replies with both calls and its grid; A sends a report; B sends an acknowledgment plus its report, such as R−12; A acknowledges, often with RRR or RR73; B may finish with 73. Exact sequencing depends on the generated messages and enabled options. The meaning matters more than memorizing one row order.
Watch what the other station actually sends. A report received for another call sign is not yours. A repeated unanswered message is a reason to stop and reconsider the path or setup, not leave the radio calling indefinitely. Use Halt Tx when you need to stop, and confirm the radio returns to receive.
Log only the contact that was actually completed. The guide's standard requires exchanged identities, information and acknowledgments; seeing your own call sign once is not enough. Verify call sign, band, mode and time in the log prompt. Keep diagnostic notes separate from a confirmed QSO.
For your next session, retain the working audio devices, radio profile and clean transmit-level settings. Recheck the clock and current band conditions. FT8 becomes much easier to understand when you can distinguish timing, audio, RF frequency and exchange state instead of treating every failed reply as a propagation mystery.